Parents who have already been able to make a dollhouse on their own or bought it in a store, having spent a significant amount, are thinking about how to make furniture for dolls with their own hands. Toy furniture isn't cheap, so why not save your family budget. You can easily make it with your own hands from improvised means.


Types of materials commonly used
To equip your daughter's dollhouse, you may need those materials that we most often throw out:
- trimming plywood sheets;
- matchboxes:
- plastic jars and boxes from cosmetics;
- shoe boxes;
- colored sponges for dishes;
- viscose napkins;
- plastic bottles;
- egg tablets;
- textile;
- foil
- wire and many other little things, the place of which we often determine in the trash can.
When choosing materials, everything will depend only on your imagination.
Plywood
Plywood and wood are the most popular and durable materials for making doll furniture. However, the process of creating interior items from them is laborious; skills of working with them will be required. But if you still make such furniture, it will serve the dolls for a very long time and will delight your daughter just as long.

In order to make miniature plywood furniture you will need:
- plywood sheets;
- jigsaw;
- sandpaper;
- small carnations or screws;
- glue;
- sheets of cardboard;
- pencil;
- ruler;
- varnish or acrylic paint;
- scissors;
- attributes that you will use to decorate each type of furniture: fabric, beads, pieces of leather, and much more ...

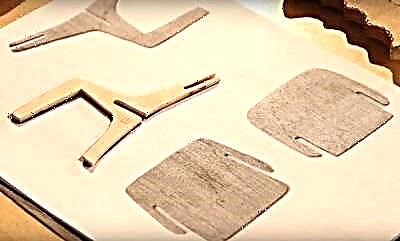
Stages of work common for all types of furniture:
- Think over or find on the Internet suitable furniture design schemes for printing.
- Draw on cardboard or use ready-made prints of furniture parts, cut them out.
- Attach the resulting templates to the sheets of plywood and circle.
- Use a jigsaw to cut parts out of the plywood.
- Sand all parts with sandpaper, the surfaces will become smooth.
- Putting the structure together. We glue the parts or fasten them with self-tapping screws.
- We cover the finished item with paint or varnish and let it dry.
- If necessary, we trim with textile elements and decorate.
So one piece of doll furniture is made.
Cardboard
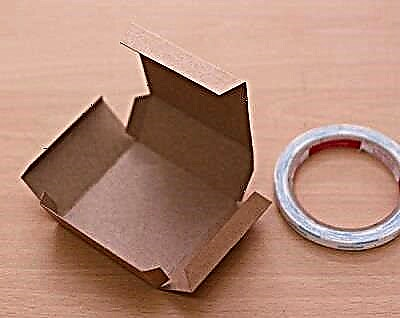
It is very easy to make cardboard furniture for a dollhouse. You can also involve a child in the manufacturing process. Cardboard is the most affordable material for work. You can use both sheets of cardboard and take small cardboard boxes as a base.
It is necessary:
- cardboard or cardboard boxes;
- white sheets of paper;
- pencil;
- ruler;
- scissors;
- glue (if necessary);
- details for jewelry.

Stages of work:
- We think over the details of the future piece of furniture and make templates on paper.
- We transfer the templates to cardboard.
- Cut out the details.
- We make the necessary cuts at the joints of the parts.
- Putting together a piece of furniture. We glue where necessary.
- We give a finished look by decorating the structure.
You can decorate the dollhouse with a new piece of furniture.


Matchboxes
You can construct almost any piece of furniture from matchboxes. Drawers will be a plus of such furniture. It is enough to show your imagination and think in detail about the image of future furniture.
We need:
- matchboxes, the number depends on what piece of furniture you will make;
- glue;
- decorations for future furniture.

Stages of work:
- We prepare the required number of matchboxes.
- We glue them together in the sequence that is necessary for the interior details.
- We decorate the resulting piece of furniture. Acrylic paint and varnish are suitable for staining.
Your daughter's dolls will be happy with the new thing.

You can make a rack for dolls from matchboxes yourself by watching the following video.
Plastic jars
Plastic jars can be great furniture in your dollhouse. Sometimes, you don't even need to do anything with them. In finished form, they can be used, for example, as a bath. The child will be able to truly bathe his dolls, the water will not pour out of them anywhere. You can design more complex interior items from plastic jars, toothpaste tube lids, and other little things. They can simply be glued together in the required sequence.


For a master class on making a toilet bowl for dolls from a shampoo container, see the following video.
Wire
From wire that bends easily, you can decorate the interior in the Provence style. Beds, the frame of which will resemble a forged product, will look very elegant. It will be possible to add a wrought iron candlestick, an unusual wrought iron chandelier. Almost any interior detail can be made using a wire frame. Your imagination will guide you in the right direction.
Egg tablets
Using egg tablets, you can perfectly equip the rooms of the dollhouse. Both plastic tablets and cardboard are useful in work. All that will be needed is to carefully think over the composition and cut out the necessary parts of the tablets.

The work may require:
- egg tablets;
- scissors;
- glue;
- acrylic paint;
- double sided tape;
- helium pen rods
and much more. Everything will depend on how your imagination is played.

Master classes
In this section, you are offered some ideas for creating furniture for dolls with your own hands.
Bed with drawers for matchbox dolls
We will need:
- matchboxes;
- glue;
- pencil;
- scissors;
- a sheet of white cardboard;
- sheets of white paper;
- paints;
- beads;
- thin wire;
- decor elements according to your taste.

Step-by-step instruction:
- Measure the height of the doll for which the bed is intended. The number of matchboxes that will be required depends on this.
- We glue the required number of boxes with the side walls to each other. This will be the base of our bed.
- If you want to make the bed taller, you can glue some kind of legs in the form of additional boxes to the extreme boxes from below.
- We glue the base of the bed with white paper so that the pull-out elements remain open.
- Draw the desired shape of the headboards on cardboard and cut it out.
- We glue the backs to the sides of the base.
- We paint the bed in the desired color.
- We fasten the beads to the pull-out elements of the boxes at the base using a wire. These are the handles of our bed.
- We decorate, cover with bedding and you can put the doll to sleep.
![]()
In the next video, you will see a master class on making a bed for a cardboard doll.
The bedside table can be decorated in the same style.
We will need:
- 2-3 matchboxes;
- glue;
- White list;
- the same paint and decor elements that adorned the bed;

Step-by-step instruction:
- We glue the boxes together by placing them on top of each other with bases.
- We glue it over with white paper, leaving the pull-out elements open.
- We paint in the style of an already made bed.
- We attach the beads to the boxes.
- We decorate.

See the next video for a master class on making a bedside table from matchboxes.
Sofa for dolls made of plywood
We will need:
- plywood;
- jigsaw;
- glue or small nails;
- sandpaper;
- cardboard;
- pencil;
- ruler;
- varnish or acrylic paint;
- pieces of fabric;
- cotton wool.
Step-by-step instruction:
- We decide on the design and size of the future sofa. We make drawings for the back, seat, side backs on cardboard. We take into account that with the help of the back and side backs, the sofa will gain stability.
- Cut out.
- We apply the resulting templates to a sheet of plywood and circle them.
- Using a jigsaw, we cut out the details of the sofa.
- If you want to make upholstered furniture, then at this stage we wrap each part of the sofa with a thin layer of cotton wool and sheathe it with fabric. If the sofa is not sheathed, it is necessary to process the details with sandpaper.
- We attach the sofa parts to each other with glue. If you have a soft sofa, then you need to fix it with small nails.
- We cover the parts not covered with fabric with varnish or paint.
- We sew small cushions for the sofa.
- We decorate to our liking and give it to the doll for use.
Chairs can be made in the same way.

You can see how to make a sofa for a doll with your own hands in the next video - a master class.
Floor lamp
For manufacturing you will need:
- thick cardboard;
- glue;
- pencil;
- lace strips;
- empty helium pen refill;
- thin wire;
- a small lid in diameter (lids from jars of medicine, from ketchup are suitable)

We draw a blank of a cone on cardboard. Cut and glue it. Cut off the top of the cone. It turned out the base of the floor lamp shade. We glue it with lace. We bend the wire in half and pass it through the rod. We attach the lampshade from above to the wire, from below to the lid - to give stability to the floor lamp. The lid can be decorated with a lace skirt. Instead of a rod, you can use beads as a stand by passing a wire through them. In this case, we also decorate the lampshade with beads.

Watch the video for a master class on making doll furniture from old boxes.
Chandelier
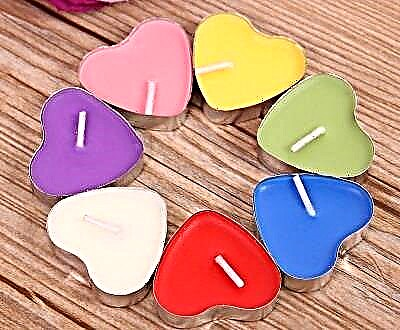
To make a chandelier, we need a small container. You can use measuring cups for medicines, disposable plastic shoots, the simplest candles in a metal case.
To decorate the chandelier, you will need strips of lace, thin strips of satin ribbon. They need to glue over the plastic base of the chandelier. You don't even need to decorate the metal case, you get an original chandelier. We attach an LED to the base of the container that we used, if you thought about a house with real lighting. Hanging from the ceiling. The method of fixing to the ceiling will depend on the materials from which the house is made.
Thus, you can make lamps in any room of your dollhouse.

Dollhouse kitchen
It will be convenient to use small boxes for making a kitchen. If there are no such boxes, then you will need to make them out of cardboard. This is not difficult to do. It will be convenient to use if the boxes are glued together, making a single structure.
If hanging cabinets are planned for the kitchen, then glue a sheet of cardboard to the back wall of the cabinets, on which we glue these cabinets. You can strengthen the structure by gluing long flat sticks to a sheet of cardboard from the back. It is necessary to cut the doors of the cabinets in the boxes.
To decorate our kitchen, we will use self-adhesive paper, or any other beautiful paper. We glue the cabinets, use wire and beads to make handles for them. The faucet can be made of wire, the mixer handle can be made of small beads. A deep lid works well for the sink. We attach it to the table top. The hob burners can be made from buttons. You can arrange the space between the cabinets in the form of a tiled apron. To do this, find a suitable picture on the Internet and print it. Stick it onto a piece of cardboard where the cabinets are attached.
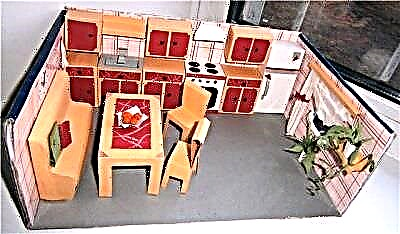
We arrange dishes and food. The kitchen is ready, you can send the hostess to cook!
You can see a master class on making a kitchen in the next video.
Dressing table for doll
We will need:
- cardboard box;
- sheet of cardboard;
- foil;
- a small piece of ceiling plinth;
- glue;
- pencil;
- colored, wrapping or self-adhesive paper.
Stages of work:
- We measure the required table height on the box so that the doll is comfortable to sit at it.
- Cut off the excess.
- The base of the table is the bottom of the box. Cut out the legs from the part below.
- We glue the resulting table with self-adhesive paper
- Draw the desired shape of the mirror on cardboard and cut it out. We glue the foil as a mirror surface.
- We decorate the mirror frame using thin strips of ceiling plinth.
- We glue the mirror to the table.
We make a chair for a dressing table in the same way. We change only the required height. Instead of a mirror surface, we make the back of the chair.

Almost any piece of furniture can be made from available tools. This requires free time, your imagination and desire. Your girl will be very happy with the new dollhouse!
The process of making a dressing table for dolls from matchboxes and cardboard, see the following video.
For information on how to make a dining table for dolls, see the next video.