Parental supervision of young children tires both parties. The child is trying to learn about the world, but he is protected, prohibited or distracted from an interesting outlet and a medicine cabinet. For a mother, on the contrary, everything falls out of her hands as soon as she sees something related to the risk of injury or damage in the field of vision of her son or daughter. Every adult is visited by thoughts about the age at which one should acquaint his baby with dangerous objects. On the one hand, you will not follow your child all your life, and on the other hand, the risk of ending up in a hospital bed for a young tomboy is too great.
Montessori technique
Especially in order to solve such a dilemma, the Italian teacher and scientist Maria Montessori proposed, within the framework of her methodology, to teach children through the knowledge of the essence of things. After all, it is not at all necessary to bring the baby to the real door in order for him to understand the principle of the heck. You can just give this item into the hands of the kid and he will figure out its functionality himself. The distinction between the actions of the child and the danger threatening him has brought the theory of teaching preschoolers to a new level.
A well-known methodologist proposed to transfer improvised household appliances to the stand for study. Thus, children will be able to learn the functionality of every little detail, and parents will no longer fear for their lives. By moving door chains, cornice rings or a zipper, the child will develop fine motor skills of his fingers and study the things that interest him. Neural signals from small fingers will be transmitted to the brain and enrich the memory of the baby with impressions. Such stimulation has a beneficial effect on the intellectual and physical development of the baby.
READ MORE about the Montessori technique:
Maria Montessori technique: basic principles, advantages and disadvantages
DIY Montessori technique: we organize a developing environment at home
Book - 60 lessons with a child using the Montessori method
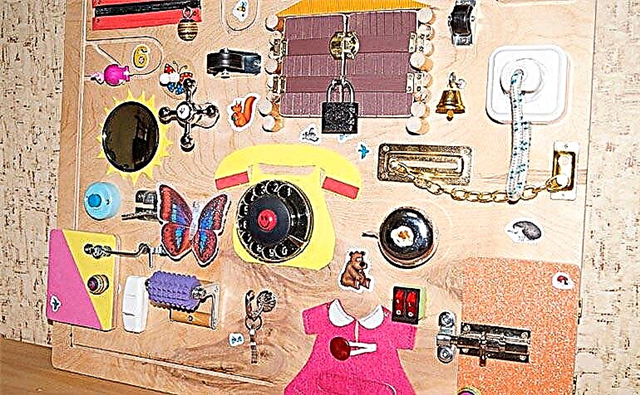
Development board with locks, clasps, toggle switches and buttons
What is this stand with visual material?
You can make a developing board with your own hands or buy a ready-made one. In fact, this is an ordinary board, with those very dangerous things fixed, from which the parents were shivering. For example, it can be an inoperative socket with a plug, a switch, cabinet door handles or a hook on the door, lacing, a bell button and even a circular dial from an old phone, i.e. it can be anything that can be touched, moved, studied without any threat to life. In the meantime, the child is busy with such a serious matter, the mother can also devote herself 10-15 minutes of free time 🙂
This development board also has its own name - busyboard. Literally "business board" can be translated as "a board to keep the kid busy." Indeed, various small objects and bright design can captivate a son or daughter for a long time.
The business board development board ensures the all-round development of the child and helps parents protect him from traumatic situations at the stage of mastering the world around him.

Every year more and more new types of development boards are produced. Manufacturers are not limited to a standard set of small parts. In pursuit of the goal of developing children's fine motor skills, materials of various textures are applied to the body of the board. Small fingers will feel rubber balls, plastic wheels, felt, a piece of wool knit and strung beads. Each of these items will give the baby new sensations and diversify his idea of the world around him.
DIY development board
In stores, you come across factory copies of development boards. Taking them as an example, it is quite possible to create a business board with your own hands. Crafts that come out of the hands of parents will be appreciated by the child more than faceless stamping.
So, you decided to create a development board yourself and now you are thinking about how best to do it. First you need to choose a base. As a rule, for this they take a small piece of plywood, plastic or laminated chipboard. A regular board will be too heavy, and a non-laminated board may instead bring your son or daughter a bunch of splinters. Small planks, the same plywood or pieces of laminate are used as additional inserts. Sometimes, for a business board, dense corrugated cardboard is taken as a basis. It will be convenient if you decide to introduce your child to the world of fabrics and sewing accessories.
The next step will be to analyze your mezzanines and old boxes for the availability of spare parts for furniture and other little things that were once a pity to throw away. If you are an advocate of cleanliness and you cannot find such parts in your home, you can always buy them in a hardware store or hardware store. Moreover, you still have to go there for screws for fasteners.
After you have fished out all the future fragments of the development board, try to arrange them and decorate the board. Often, to emulate the entrance doors, small boards are placed on the board on small hinges, which the kid can lock himself with various types of locks and locks. A niche can be placed behind such a peculiar door. Then the child will be able to arrange hiding places there, hiding his favorite baby doll or a donated candy. It doesn't matter if something doesn't fit on the first version of your business board - in the future you can always add these copies to the board if something goes wrong there.
And, finally, the last stage is to securely fasten all the fragments with self-tapping screws or nail them down. Examine the opposite side of the board carefully. The protruding sharp ends of the screws can injure the child, so it will be necessary to process them with emery or a file.
Material to use
It is best if elements made of various materials are attached to the board - fabric, metal, plastic, rubber. This diversifies the range of sensations and does not have time to become boring to the baby. The most used parts are:
[sc: rsa]


- Door latches, locks, latches, latches, hinges, handles, curbs and everything that is called door hardware. Something could just serve as a frame for a business board.
- Furniture casters.
- Rollers for construction, massage. Even a thick toilet paper sleeve will do.
- Lacing. An image of shoes is usually drawn on the basis, rivets are attached to it and the laces are tucked in according to all the rules. It is better if you choose bright colors for this element.
- Fasteners, zippers, Velcro, buttons, hooks and loops. All of this can be found at a sewing store and sewn onto durable scraps of fabric, which will then be fixed on the base.
- Bells or similar parts that make sound. An old doorbell or xylophone parts will do.
- Abacus, large rings on a piece of old cornice or just beads strung on a string. By moving them in different directions, the kid can learn to count.
- Old telephone dial or keypad from a mobile device.
- Lightning. For simplicity, usually zippers of the "tractor" type are used, you can attach them with good glue or a stapler, and arrange again with a drawing: for example, it can be a jacket or a crocodile, which has zippers instead of teeth!
- Toggle switches, switches, bell button or other similar items.
- Mirrors with protective edge.
- Pieces of various fabrics.
- Flashlights and lighting. Naturally, the most simple and understandable for the child.
- Postal locks with keys.
- Buttons, animal eyes and other sewing accessories.
- Panel with buttons from unnecessary electrical appliances and much more ...
This list is just a rough guide to what you can use. If you find something different at home that will be useful for the development of your child, add this element to your development board. The main thing is that the new fragment is safe and cannot injure the child in your absence.